Riga Round 20: Norway vs Iceland
With only nine matches remaining in the tournament, the featured matchup was Iceland against Norway. Iceland had quietly emerged as one of the tournament's dark horses, as few would have predicted them to be in contention for a top-eight finish at this stage.
This set, however, was absolute chaos. There were so many entertaining and swingy deals that I genuinely had to use a random number generator to decide which ones to cover. Nearly every board had something interesting to offer.
Haraldsson | Bakke | Magnusson | Brogeland |
1♦ | P | ||
2♣ | P | 2♦ | P |
2♥ | P | 2♠ | P |
2NT | P | 3NT | AP |
After an artificial auction, the Icelandic pair arrived in 3NT. I'm not sure whether any of West's bids were relays or served another artificial purpose, but it appears the partnership may not have communicated their diamond fit effectively. Otherwise, it seems unusual that West never supported diamonds after the 2♠ bid.
Helgemo | Olgeirsson | Heiberg-Evenstad | Johannsson |
1♦ | P | ||
2♣ | P | 2♠ | P |
3♦ | P | 3♥ | P |
4♣ | P | 4♦ | P |
4♥ | P | 4♠ | P |
6♦ | AP |
This room featured a fairly standard 2/1 auction. After his partner's 2♠ rebid, Helgemo immediately raised diamonds, allowing the partnership to begin cue-bidding at a comfortable level before eventually reaching the cold slam.
Only two key cards were missing: the ♠K and ♦K. Declarer needed just one of the two finesses to succeed, giving the contract a practical 75% chance of making. The third club loser could be discarded on a heart winner.
After the opening lead of the ♥Q, declarer won in hand, crossed to dummy with a club, and immediately took the diamond finesse, which was successful. Although the ♠K was offside, the ♦K was onside, and declarer had no trouble taking all twelve tricks.

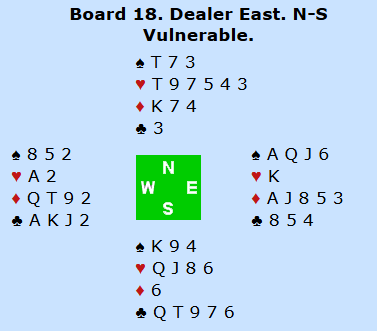
Sitting East, you find yourself declaring 6♦. The contract has plenty of play, with trumps being the only real concern. You can afford to lose one diamond trick, but not two. Simply cashing the ♦A from dummy fails whenever South holds all the outstanding trump honors, while leading the ♦Q loses if North has them all.
So is there a line that guarantees the contract? In fact, there is a safety play that ensures you lose at most one trump trick.
Start by winning the ♥A, then cash two high spades, discarding a heart. Ruff a heart back to hand and lead the ♦10. If South shows out, simply win with the ♦A, return to hand, and concede a diamond to North.
If South follows low, play low from dummy. Even if North wins the trick, you have eliminated the danger of losing two trump tricks. The only exception would be the extremely unlikely case where South began with a singleton ♦K and was able to overruff later after discarding all of their side-suit cards. Given the opening heart lead, that layout is virtually impossible in practice.

On the actual deal, South held all the outstanding trump honors. Rather than taking the virtually foolproof safety play, declarer simply cashed the ♦A and immediately conceded two trump tricks, going down one.
That is a costly error at this level of bridge. Instead of winning 13 IMPs against the routine 3NT contract at the other table, Iceland lost 12 IMPs on the board. A missed safety play turned a potential 13 IMP gain into a 12 IMP loss, a swing of 25 IMPs.

This hand offered an interesting combination of slam bidding and declarer play, with the choice of strain playing an important role. A contract of 6♣ by either side is completely cold given the club and heart layout. Even after a diamond lead, there is no need to guess the position of the diamond honors, as declarer can simply establish the hearts and discard East's diamond losers. By comparison, this would certainly qualify as one of the easier slams to play.
A contract of 6♥ is also cold from either side, although it is slightly more challenging when declared by West. After a spade lead, the play is straightforward, as West's two diamond losers can be discarded on the ♠K and the fifth club.
But what if the defense finds the more testing lead of a low diamond? The winning line is to take the ♦A, draw trumps, establish the clubs, and discard the spade loser. Then lead a diamond toward the queen, limiting the defense to a single diamond trick. The line almost reminds me of like a Morton's fork situation. Of course, it still requires good judgment. A low diamond lead from North could easily come from a holding such as ♦KJ(xx+), which is often an attractive lead against a slam.
Unfortunately, reaching the slam was far from straightforward, as the opponents had plenty of opportunities to make life difficult. That is exactly what happened in the open room:
Haraldsson | Bakke | Magnusson | Brogeland |
P | 2♣ | 2♠ | |
P | 4♠ | P | P |
X | AP |
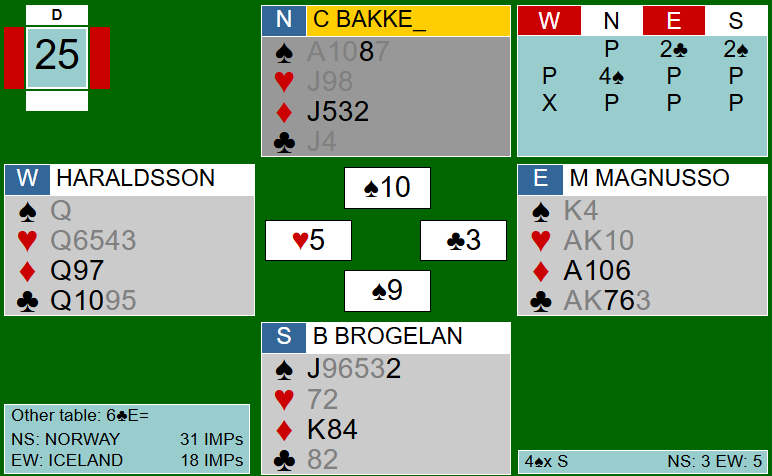
Given the favorable vulnerability and partner's failure to open, Brogeland's 2♠ overcall was a well-justified attempt to disrupt the opponents' strong club auction. One could even argue that he might have been able to bid more aggressively. North's pass over 2♠ likely showed more than a complete bust, and West later entered the auction with a double of game, which ended the bidding.
There was little to discuss in the declarer play, but Brogeland did find a nice safety play in diamonds to guarantee six tricks and limit the damage to -800.
Helgemo | Olgeirsson | Heiberg-Evenstad | Johannsson |
P | 2♣ | 2♠ | |
3♥ | 3♠ | P | P |
4♣ | P | 4♠ | P |
4NT | P | 6♣ | AP |
Here, the Norwegians were unfazed by the overcall. Helgemo bid 3♥ despite his modest suit quality, and after North competed with 3♠, Helgemo returned with 4♣. My guess is that East's pass over 3♠ showed a stronger hand, while bidding game directly would have denied any slam interest or shown the weakest hand type.
Once the club fit was established, Helgemo continued with 4NT, and his young partner placed the contract in 6♣. As mentioned earlier, the defense had no realistic chance of defeating the slam.

Iceland picked up 22 IMPs on the final two boards of the set. This deal was one of the key contributors.
East and West found themselves committed to an inverted minor auction, one of those conventions that can occasionally leave a partnership boxed into an awkward sequence. On this deal, that is exactly what happened.
Helgemo | Olgeirsson | Heiberg-Evenstad | Johannsson |
1♣ | P | 2♣ | P |
2NT | P | 3♥ | P |
3NT | AP |
South surprisingly remained silent throughout the entire auction, a decision that seems somewhat conservative given the favorable vulnerability. A takeout double, a 2♦ overcall, or even a lead directing 2♠ bid could all be justified alternatives.
After the 3♥ splinter, Geir Helgemo showed no further interest in exploring for slam, especially with what appeared to be three wasted high card points in hearts. In 5♣, he comfortably took six club tricks, two hearts, two diamonds, and a spade for eleven tricks. Meanwhile:
Haraldsson | Bakke | Magnusson | Brogeland |
1♣ | P | 2♣ | 2♦ |
3♣ | P | 3♦ | X |
P | P | XX | P |
3NT | P | 4♣ | P |
4♦ | P | 4♥ | P |
4♠ | P | 4NT | P |
5♠ | P | 6♣ | AP |
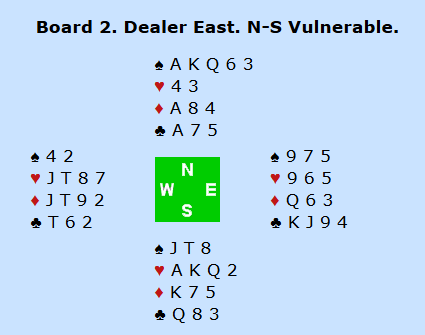
Here, the Icelandic pair reached the slam despite the interference. The diamond opening lead effectively sealed the contract, as declarer could afford to lose the ruffing finesse with the ♠A still intact as an entry.
It appeared that Brogeland's double of 3♦ was intended to steer partner away from a diamond lead, but Bakke led the suit anyway. A spade lead would have posed a much tougher problem, forcing declarer to ruff out South's Kxx of hearts. While that line is certainly difficult to find at the table, it is nevertheless available.


Comments