Riga Round 9: Norway v Belgium and France v Italy

Norway v Belgium: Score 35-34 IMPs
A very tight match! There were many swings that benefitted both sides.
Board 11

The choice is between 3N and 4H: although EW have an 8-card heart fit, they're doomed to lose 2 clubs, 1 diamond, and 1 spade in 4H. 3N, by contrast, is cold: the defense cannot get their spade and set up their clubs before declarer establishes diamonds for enough tricks. The question is, how do you know to disregard the 5-3 fit? How could you avoid 4H at the table?
First, the Norwegian EW pair's auction:
West (Helgemo) | North (De Roos) | East (Heiberg-Evenstad) | South (Arts) |
P | |||
1H | P | 1S | P |
1N | P | 2D | P |
2H | P | 4H | All Pass |
A seemingly normal auction: 2D was artificial and game forcing, and West's 2H indicated strength in hearts, but not extra length (since Helgemo would bid 2H instead of 1N if he had 6 of them). Seeing partner's heart quality, and not willing to risk the diamond or club suit running, Heiberg-Evenstad chose 4H instead of 3N. With 16 HCP, this is a very reasonable action: he has enough points to make taking 10 tricks by his side likely even without any ruffs, and 3N can be defeated on many deals where a defender holds a 5-card minor. It may be possible to infer partner must have 2=5=3=3 since with 3 spades, he would likely bid 2S over 2D. Although that strengthens the case to bid 3N since the defenders have less cards in the minors, 4H is still a reasonable choice for the reasons stated above.
Unfortunately, 4H was unmakeable after North's club lead. Now for the other table:
West (Bahbout) | North (C. Bakke) | East (de Donder) | South (B. Brogeland) |
P | |||
1H | P | 1S | P |
1N | P | 3N | All Pass |
Over 1N, East decided to ignore his 3-card heart support and jump to 3N. This action is also very reasonable: since East is 4333, the short hand cannot ruff anything in 4H. Therefore, having hearts as trump produces no extra tricks, so might as well be in 3N where the requirement is 9 tricks instead of 10. Although stoppers may be a concern, East's minor suit holdings offer some sense of protection for their side. Also, if partner's hearts are small, 4H could be in lots of trouble if trumps break badly. So, rather than reveal more information about the hand to the defenders with a 2D bid, de Donder bid 3N to let the opponents guess: sometimes, 3N is down but makes on the wrong lead.
On this hand, the defense started by dislodging the ace of clubs, but after declarer knocked out the ace of diamonds, he had 9 tricks: 1 club, 1 spade, 2 diamonds, and 5 hearts. 10 IMPs to Belgium.
Weighing both sides of the argument, what do you think? 3N or 4H? In my opinion, it is very close. I may start with 2C with East's hand to set up a game force, after which I would raise partner's hearts, missing out on 3N. The pro field is also very split on the decision: around half of the field opted for 3N while the other half chose 4H.
Board 15
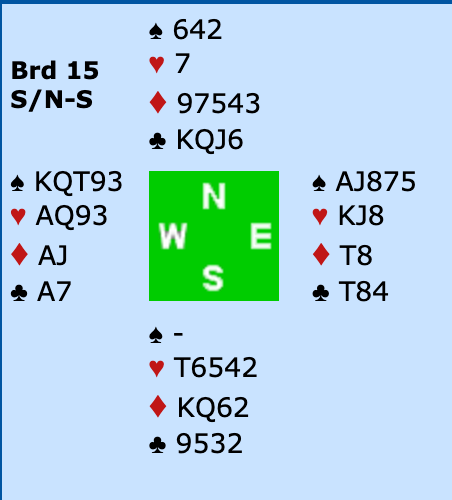
A slam hand! 6S is completely cold with the EW cards. How do we get there?
Norway's auction:
West (Helgemo) | North (De Roos) | East (Heiberg-Evenstad) | South (Arts) |
P | |||
1S | P | 3S | P |
6H | P | 6S | All Pass |
Not sure how much value 3S promised, but I assume it's a 4-card limit raise, which is what the East hand evaluates to. Helgemo's hand is huge after that: with all the keycards except the SA, asking keycards was unnecessary. He basically has a hand that will almost always want to be in slam opposite a limit raise: give partner 1 less spade and 6S is still cold, and that hand only has 9 points and is short of a limit raise. 6H could've been trying to suggest hearts as a playable strain: there may be some weird hands where 6H is a better contract (though I can't construct any off the top of my head). I doubt Helgemo was looking for grand slam with that bid, since he could take it much slower and start with 4C. Nevertheless, good hand evaluation from both sides, reaching a 6S that cannot be defeated.
The Belgians' auction:
West (Bahbout) | North (C. Bakke) | East (de Donder) | South (B. Brogeland) |
P | |||
1S | P | 3D | X |
XX | P | 3S | P |
4S | All Pass |
I assume 3D showed a 4-card limit raise in the EW system. South's double was lead directing, asking North to lead a diamond. West's redouble probably showed a first round control in diamonds: this is how many pairs play the redouble in this situation. East's 3S was not forcing and showed a minimum limit raise. Opposite a minimum limit raise, despite holding a monster, West decided that 4S was enough.
In my opinion, West's hand is worth more than 4S: with likely 30 HCP and a 9-card fit, as well as the prime controls and the 4-card heart suit, even if partner is a minimum limit raise, West's hand should still be thinking about slam. You don't need much from partner to make it, and he could've at least cuebid 4C, waiting for a second opinion from partner. If East bids 4S, dropping it right there is reasonable, but especially if East bids 4H (which he may do on this hand), you want to drive to slam. Of course, the lead-directing double is worrisome since you can't count on the wrong lead from the opponents anymore, but it's just a small concern with your AJ of diamonds. This board cost the Belgian team 13 IMPs.
France v Italy: Score 34-5 IMPs
Board 1

Both tables reached 4S by West in uninterrupted auctions. The declarer play is what makes this interesting. With the 4-1 spade break, playing spades wrong means declarer is at risk of losing 3 spades and 1 heart.
When the Bessis(North) led a low diamond, Versace(West) had to decide how to play the spades for 2 losers. Of course, if the heart finesse is on, the contract is cold even when losing 3 spades. What's the right suit combination play?
Taking a look at spades alone, they will come in whenever they're 3-2, and 5-0 is another beast in which it's very hard to make the contract. So, we focus on the 4-1 splits: playing low to the Q works when North has any singleton (double finesse South's spades). Playing low to the K works when South has singleton A, J, T, 8 or North has singleton J, T. Playing low to the 9 works when South has singleton A, J, T, 8 or North has singleton A, 8, 2. Playing low from both hands works when South has singleton A or North has singleton A, J, T. So, from spades alone, playing low to the 9 is the percentage play.
But there are several more factors into the play than just the spade suit. East has limited to no entries: the hearts must be set up, and in case South ducks the heart, an entry to dummy after the trumps are drawn must be available. So, knowing the entry issues, Versace made a slightly inferior spade suit play in order to conserve as many entries to the board as possible. He won the diamond lead in is hand and played a spade to the Q. Unfortunately, that was not a success on this board, and he actually went down 2 when his heart communications were severed and he was left with a low club loser in his hand. This is just a tough hand to declare - catering for the 4-1 splits as well as needing to set up the heart suit with limited entries is just hard.
At the other table, France's Lhussier received the singleton heart lead from North. Now, there are even more things to be worried about: in addition to all the entry problems, North may get a heart ruff. Lhussier went up with the ace and played a low spade to the king. This was for two reasons: firstly, if South has the ace of spades, he wants to ensure the only spade tricks he will concede are that ace and a heart ruff. Secondly, he's already in dummy after the ace of hearts anyways, so playing a spade to the king follows the flow of the hand.
When Donati won the ace, he returned the ten of spades. Perhaps a passive diamond return would be better: would declarer know to play him for JTx of spades remaning? From spades alone, the right play is to cater for this scenario. But that would be a blunder if North actually held AJx and his partner held Tx: South would win the spade and give North a heart ruff for down one. Of course, North doesn't know this, but don't do declarer's dirty work for him. Nevertheless, a spade return could serve to cut declarer's entries to the heart suit, which North presumed wasn't running from his partner's encouraging heart.
After that, declarer simply knocked out the HK and SJ, making the contract. Note the importance of diamond Jx: declarer used the low diamond to get back to his hand after ruffing a club in dummy to draw the last trump, and he crossed back to the DJ to enjoy the rest of his heart winners. When the dust settled, 4S made and France gained 11 IMPs.
Board 3

On the layout, 6H by EW makes. But it requires what is basically just a finesse: if the CQ is onside, you make it under normal circumstances; if the CQ is offside, you are doomed barring extreme luck in spades or diamonds.
The Italian EW pair's auction:
West (Versace) | North (Bessis) | East (Sementa) | South (Lorenzini) |
P | |||
1N | P | 2C | P |
2H | P | 4H | All Pass |
A normal auction to reach a normal 4H, which under a diamond lead by North smoothly made 6 after the CQ was onside.
The French EW pair's auction:
West (Lhussier) | North (Donati) | East (Bernard) | South (Percario) |
P | |||
1D | 1S | X | P |
2S | P | 2N | P |
4H | P | 4N | P |
5S | P | 6H | X |
All Pass |
With good intermediates, West upgraded his hand and opened 1D. Favorable and opposite a passed hand, Donati decided to disrupt the opponents' auction and overcall 1S. 2S didn't necessarily promise a heart fit, but his 4H later shows heart support and a good hand. Having so many extras he didn't show yet, East decided to keycard to slam. But here the 1S bid backfires: believing North has sufficient values for a normal overcall (around 7+ HCP), South decided that with stuff in the minors and partner bidding spades, 6H was going down and thus doubled.
Unfortunately, 6H was not going down, and after the club lead and a club return, West simply ruffed 2 diamonds in dummy high and claimed the balance. +14 IMPs to France.
Conclusion
The pace of these matches may slow down - with the summer nationals in America right around the corner, Eric and I may be more focused on playing bridge then recapping it. Nevertheless, we will make sure to keep doing these, so follow to see our progress.


Comments